
Field and Stream Magazine Article
Southerners can leave such a structure in year-round, but those of us that live in cold climates have had to endure two awful jobs: putting the dock in the water in spring and then taking it out before freeze-up. The tasks are about as appealing and as much fun as getting your gums scraped.
But the Field & Stream boat dock can change all that. It’s been designed to be strong, stable, and roomy enough for a couple of anglers to fish off the end; best of all, the dock can be easily installed or removed by one person. Although no two bodies of water (or their shorelines) are alike, the design and construction principles of our dock can be applied to virtually any lake, pond, or river across the country.
Dock Basics
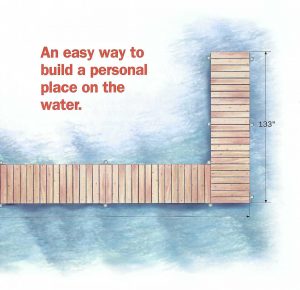
The length of a dock depends on location, water depth, shoreline, and boat length. Our dock is 42 feet long because the warmwater lake it sits in has a gradually sloping, shallow bottom with a water depth of only 3 feet even 40 feet from shore. The straight portion of the dock consists of several 92-inch sections bolted together. You can add or remove sections and shorten or increase leg length to suit the requirements of your location. Our dock has a slightly wider section that takes a left turn at the end to increase overall stability. The L-shape also allows room for two anglers to sit on the 4-foot dock-mounted bench we installed. Because many areas limit a dock’s length, consult local zoning ordinances before you start building.
How you anchor the dock depends on the shoreline. We mounted our dock to an 8-foot by 12-foot deck, anchored in front by concrete piers. The back of the deck rests on large rocks that were set naturally deep into the shoreline. To make the piers, we dug two 42-inch-deep holes at the water’s edge, slipped 8-inch-diameter cardboard construction tubes into the holes, and filled them with concrete. Four 48-inch-long reinforcing rods tapped into the wet concrete, flush with the tops of each pier, added strength. Four-inch-square anchors set into the wet concrete allow the deck stringers to be fastened to the piers with galvanized screws.
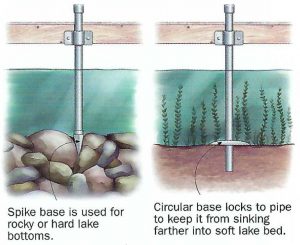
A well-maintained dock should last 40 years or more. Key to that longevity, however, is the hardware system. Hardware is also an important factor when it comes to ease of removal and installation. We chose RDS dock hardware from Quality Castings of New Hampshire. RDS makes complete hardware systems for floating and stationary docks. The system we selected employs heavy cast-aluminum side brackets that connect dock sections together. The brackets also hold 1 1/2-inch-diameter galvanized water pipes, which serve as dock legs. A single stainless-steel bolt (supplied with bracket) clamps the leg to the bracket, which makes installing and leveling dock sections a one-man operation.
Because our lake has a soft, sandy bottom, we selected RDS’s 10-inch-diameter bases. You drop the leg through the base, then drive the leg 18 inches into the bottom before clamping the base to the leg so it rests on the bottom. This makes for an extremely stable, level installation because the base prevents the leg from sinking farther into the bottom during the season. RDS also makes spike bases that can be driven into hard bottoms or placed between rocks. A malleable cast-iron drive cap from RDS fits over the top of the pipe to prevent damage when the pipe is being hammer-driven into the lake bottom. After driving, an aluminum trim cap finishes off the top of each leg. RDS corner brackets fasten the dock to the deck and also support the inside corner of the end section.
For greater ease of operation, we constructed the dock tread sections to be easily removable from the stringer sections. This allows the stringers to be carried into the lake, bolted together, and leveled by one person. Then the treads can be installed one section after the other by wheeling them into place using a hand truck. To remove the dock, you simply reverse the process and stack the stringer and tread sections on the deck or a level surface for the winter.
For greater ease of operation, we constructed the dock tread sections to be easily removable from the stringer sections. This allows the stringers to be carried into the lake, bolted together, and leveled by one person. Then the treads can be installed one section after the other by wheeling them into place using a hand truck. To remove the dock, you simply reverse the process and stack the stringer and tread sections on the deck or a level surface for the winter.
Both the deck and dock stringers are constructed with pressure-treated two-by-sixes. The deck surface, dock treads, and tread stringers are made from 5/4 Thompsonized decking, a new kind of lumber that is pressure-treated with Thompson’s water seal as well as the standard chromium copper arsenate. The water seal helps maintain appearance and reduces weather checking. Thompsonized decking is available at Home Depot.
Putting It All Together
To build the dock, you’ll need a cordless drill/driver, chop saw, mini-sledgehammer, combination wrench set, sockets, Allen wrenches, and drill bits. Begin construction by building a deck or suitable anchor placement to mount the dock. Next, construct the appropriate number of 92-inch stringer sections for your dock by fastening the two-by-six sides to the ends with 3-inch decking screws. After squaring each section, fasten the 5-inch gussets, made from two-by-six scrap, into each corner of the section.
The 133-inch end stringer section is constructed in the same manner as the straight section, except an additional stringer is screwed in at the center to give extra support to the wider dock treads. Braces mounted between stringers keep the center stringer from twisting over time.
To make the dock treads, begin by cutting all treads and tread stringers to the proper length, then fasten the former to the latter with 1 1/2-inch galvanized screws. Because the dock treads are screwed to the tread stringers from underneath, there are no visible screw heads on the tread surface. This reduces splintering, improves appearance, and increases the life of the treads considerably.
After the stringers and treads are constructed, you can install the dock. Begin by installing the first stringer section to the shoreline anchor. If you’re anchoring the dock to a deck, mount the RDS corner brackets to the front of the dock by through-bolting each bracket with a 5-inch bolt. RDS recommends using stainless-steel fasteners to reduce thread corrosion. However, we used galvanized fasteners because they cost so much less. To reduce the chance of thread corrosion, we coated the threads with Permatex anti-seize compound, available at auto parts stores.
Next, bolt side brackets to the front end of the first stringer section with 3-inch bolts. Set the first stringer on the ledges of the dock-mounted corner brackets and secure with 3-inch bolts. Then move to the front of the stringer and slip two legs into the side bracket holes and through the bases. Using the RDS drive cap and mini-sledgehammer, drive each leg into the lake bottom. Level the stringer side-to-side and front-to-back using a carpenter’s level before clamping the brackets to the legs. Install additional stringers by repeating the above procedures.
To install the dock treads, begin by dropping the first tread section into the stringer closest to shore. Then install successive stringers using the hand truck.
Materials List
| Quantity | Item description |
|---|---|
| 54 | 8-foot-long 5/4 x 6 for treads and tread stringers |
| 16 | 8-foot-long 2 x 6 for dock stringers |
| 3 | 12-foot-long 2 x 6 for end dock stringers |
Hardware Required
| Quantity | Item description |
|---|---|
| 8 | 10-foot-long 1 1/2-inch-diameter Schedule 80 aluminum pipes |
| 16 | 1 1/2-inch-diameter RDS pipe caps |
| 16 | 1 1/2-inch-diameter RDS pipe bases |
| 1 | RDS leg drive cap |
| 3 | 1 1/2-inch-diameter RDS corner brackets |
| 13 | 1 1/2-inch-diameter RDS straight brackets |
| 2 | 3/8-16 x 5-inch bolts |
| 34 | 3/8-16 x 3-inch bolts |
| 36 | 3/8-inch flat washers |
| 36 | 3/8-inch lock washers |
| 36 | 3/8-inch nuts |
| 7 lb. | 1 1/2-inch galvanized deck screws |
| 4 lb. | 3-inch galvanized deck screws |
| 1 | RDS dock bench (brackets provided; additional hardware required included in this list) |
| 1 can | Permatex anti-seize compound |